搜索到
576
篇与
的结果
-
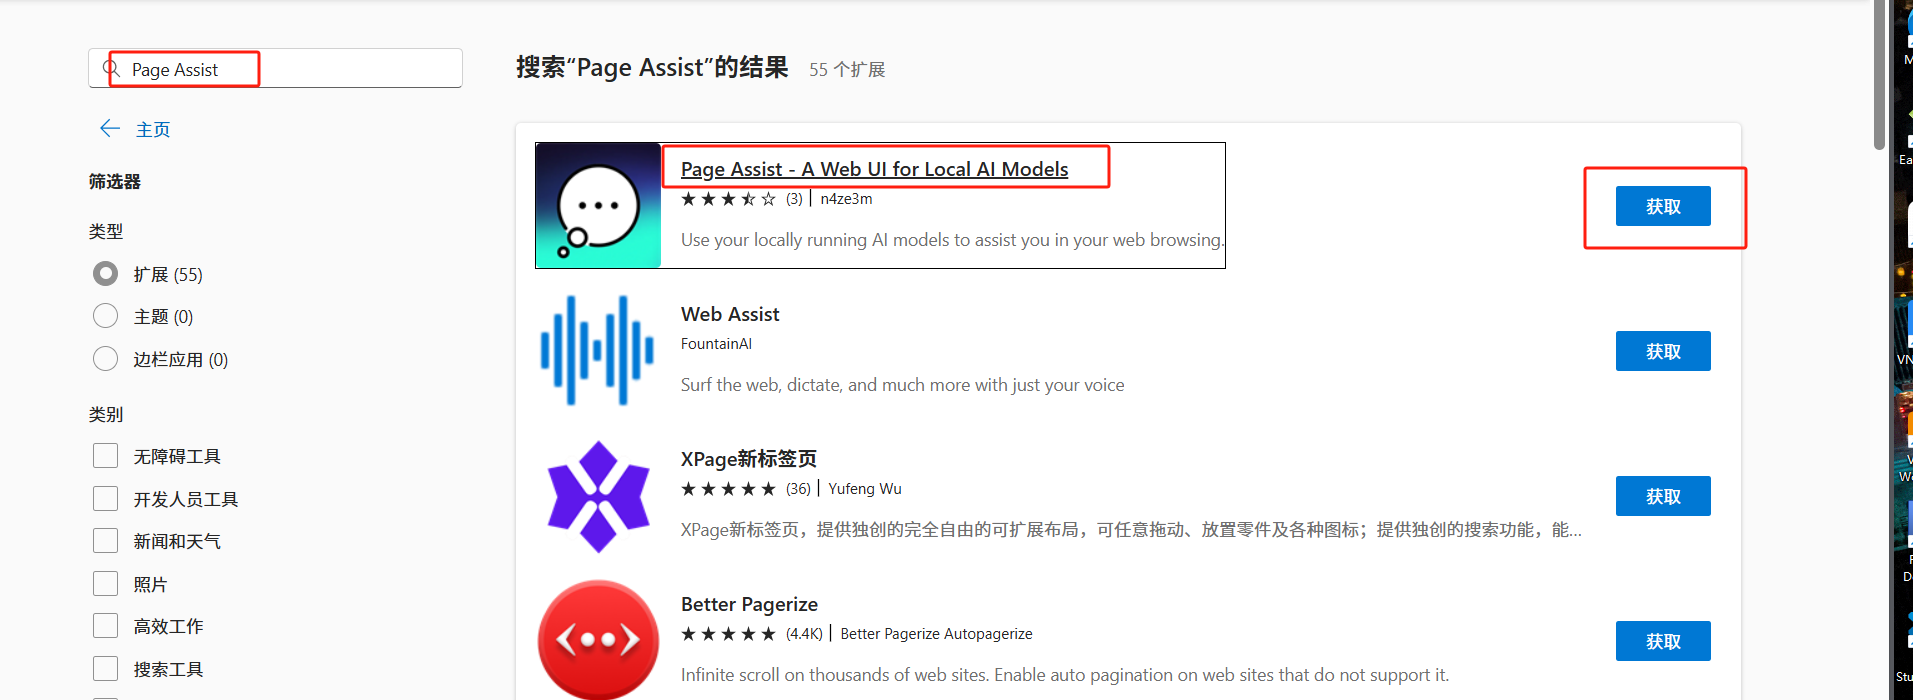
 使用Page Assist实现本地部署DeepSeek对话及数据投喂 在 ollama本地部署 DeepSeek详细教程:小白也能轻松搞定! 中我们实现了deepseek的本地部署及使用chatbox可视化界面搭建,但是chatbox无法进行本地模型的训练,界面也不是很美观,这里我们介绍另外一个浏览器插件Page Assist实现模型对话与训练。安装Page Assist插件我是用的Edge浏览器,Chrome浏览器也是类似的。打开扩展界面,搜索Page Assist第一个就是,点击获取进行安装安装完成后,点击这个小图标(真的好小)如果本地ollama正在运行,会出现下面的页面我们点击右上角的设置按钮,进行设置先修改一下语言,改成简体中文设置完成后,返回首页,在左上角选择我们的模型,就可以进行对话了本地模型训练为了让模型更加了解我们的需求,我们可以给模型投喂数据,这里我们需要用一个量化的工具,把各种格式的数据量化给人工智能,让它能看得懂。也就是RAG。这里我们使用ollama提供的nomic-embed-text可以打开[](https://ollama.com/library/nomic-embed-text)这个页面查看拉取命令将命令ollama pull nomic-embed-text复制到终端里面执行即可安装完成后,我们进入Page Assist的设置界面在RAG设置标签页,选择nomic-embed-text:last然后切换到管理知识页,点击添加新知识,就可以对我们的模型进行投喂了添加完成后,可以查看处理状态及历史数据
 -
ollama本地部署 DeepSeek详细教程:小白也能轻松搞定! 2025蛇年伊始,DeepSeek如平地惊雷般引发空前讨论,不知腾讯等大厂的产品积极拥抱DeepSeek,就连我们普通人就在使用DeepSeek解决一些问题,俨然进入了全民AI时代。DeepSeek-R1 已发布并开源,性能对标 OpenAI o1 正式版。DeepSeek 不同版本模型硬件要求不同版本对应参数量不同,参数量越大,使用效果越好,当然对应电脑配置要求越高。以下是 DeepSeek 不同版本模型的硬件要求,小伙伴们可以结合自己电脑配置选择版本模型版本参数量显存需求(FP16)推荐 GPU(单卡)多卡支持量化支持适用场景DeepSeek-R1-1.5B15亿3GBGTX 1650(4GB显存)无需支持低资源设备部署(树莓派、旧款笔记本)、实时文本生成、嵌入式系统DeepSeek-R1-7B70亿14GBRTX 3070/4060(8GB显存)可选支持中等复杂度任务(文本摘要、翻译)、轻量级多轮对话系统DeepSeek-R1-8B80亿16GBRTX 4070(12GB显存)可选支持需更高精度的轻量级任务(代码生成、逻辑推理)DeepSeek-R1-14B140亿32GBRTX 4090/A5000(16GB显存)推荐支持企业级复杂任务(合同分析、报告生成)、长文本理解与生成DeepSeek-R1-32B320亿64GBA100 40GB(24GB显存)推荐支持高精度专业领域任务(医疗/法律咨询)、多模态任务预处理DeepSeek-R1-70B700亿140GB2x A100 80GB/4x RTX 4090(多卡并行)必需支持科研机构/大型企业(金融预测、大规模数据分析)、高复杂度生成任务DeepSeek-671B6710亿512GB+(单卡显存需求极高,通常需要多节点分布式训练)8x A100/H100(服务器集群)必需支持国家级/超大规模 AI 研究(气候建模、基因组分析)、通用人工智能(AGI)探索DeepSeek本地安装目前ollama已经支持DeepSeek,我们这里也使用ollama进行安装。下载并安装Ollama访问Ollama官网 下载选择自己电脑对应的操作系统版本进行下载安装即可。也可以直接使用下面的链接下载对应系统版本Windows MacOS Linux可以直接使用curl命令安装,命令如下curl -fsSL https://ollama.com/install.sh | sh本文以Windows为例进行介绍验证Ollama是否安装成功下载后,会得到OllamaSetup.exe文件,直接双击安装,完成后,打开终端,输入ollama -v,如果输出对应的版本号代表安装成功。通过Ollama部署DeepSeek 模型之前部署过1.5B的,感觉效果差强人意,这次尝试一下7B的,也可以选择其他版本详细部署版本可以查看 https://ollama.com/library/deepseek-r1 命令行输入:ollama run deepseek-r1:7b 拉取DeepSeek模型7B模型大概4.7G,根据电脑网速,下载时间有所不同下载完成后,就可以进行对话了每次进行对话时,可以在命令行输入:ollama run deepseek-r1:7b部署可视化前端界面目前虽然已经可以在终端进行对话,但是界面比较简陋,我们可以使用Chatbox这个可视化图文交互界面来提升使用体验。进入 Chatbox官网 下载对应版本的安装包。安装完成后,打开,选择使用自己本地模型在弹出的界面,选择ollama api在弹出界面中,模型选择本地模型,因为我部署的是deepseek-r1:7b,所以选择deepseek-r1:7b即可然后就可以进行对话了
-
Harmony OS Next自定义键盘实现车牌输入 爱车记App有一个我的车库功能,用户可以维护自己的车辆信息,包括车牌号码,为了方便输入车牌,可以通过自定义键盘的方式实现车牌号码的录入。 //展示的text @State @Watch('setCarNumberText') carNumberText: string = ""; //屏幕宽度 @State screenWidth: number = 0; @State isShow: boolean = false @State inputValue: string = "" //车牌号最大长度 @State carNumberMaxLength: number = 8; @State carNumberIndex: number[] = [] //控制动画的 @State showMouse: boolean[] = []; @State isFirstInput: boolean = true provincesKeyBoard: string[][] = [["京", "津", "晋", "冀", "蒙", "辽", "吉", "黑", "沪"], ["苏", "浙", "皖", "闽", "赣", "鲁", "豫", "鄂", "湘"], ["粤", "桂", "琼", "渝", "川", "贵", "云", "藏"], ["陕", "甘", "青", "宁", "新", "", getStringFromResource($r("app.string.item_key_delete"))]] commonKeys: string[][] = [["1", "2", "3", "4", "5", "6", "7", "8", "9", "0"], ["Q", "W", "E", "R", "T", "Y", "U", "I", "O", "P"], ["A", "S", "D", "F", "G", "H", "J", "K", "L"], ["Z", "X", "C", "V", "B", "N", "M"], ["港", "澳", "学", getStringFromResource($r("app.string.item_key_delete"))]] commonKeyBoard: CommonKeyItem[][] = [[], [], [], [], []] // 输入框的大小 inputBoxSize: number = 0 controller: TextInputController = new TextInputController() //未选中的样式 private btnCancelBorder?: commonBorder = { width: '3px', color: '#ccc', style: BorderStyle.Solid } //选中的样式 private btnCancelBorderActive: commonBorder = { width: '3px', color: Color.Red, style: BorderStyle.Solid } build() { // 车牌 Column() { Text($r("app.string.car_number")) .fontSize(10) .fontColor($r("app.color.label_font_color")) .alignSelf(ItemAlign.Start) this.carNumberComponentBuilder() } .justifyContent(FlexAlign.Start) .padding({ left: 15, right: 15 }) .width('100%') .borderRadius(15) } } onPageShow(): void { //自定义键盘 this.screenWidth = 1080; this.showMouse = new Array(this.carNumberMaxLength).fill(false); this.showMouse[0] = true for (let i = 0; i < this.carNumberMaxLength; i++) { this.carNumberIndex[i] = i } this.inputBoxSize = px2vp(this.screenWidth) / (this.carNumberIndex.length + 1) - 2 for (let i = 0; i < this.commonKeys.length; i++) { for (let j = 0; j < this.commonKeys[i].length; j++) { this.commonKeyBoard[i][j] = new CommonKeyItem(this.commonKeys[i][j], true) } } } /** * 车牌号改变监听 */ setCarNumberText() { if (this.carNumberText.length == 0) { this.isFirstInput = true } else { this.isFirstInput = false } this.getForbiddenInput(this.carNumberText) this.handelInputTxt(this.carNumberText.length, this.carNumberText); this.myCar.number = this.carNumberText } //可以控制禁止输入的按键 getForbiddenInput(input: string) { // if (input && input.length === 1) { // this.commonKeyBoard[0][0].display = false // this.commonKeyBoard[0][1].display = false // this.commonKeyBoard[0][2].display = false // this.commonKeyBoard[0][3].display = false // this.commonKeyBoard[0][4].display = false // this.commonKeyBoard[0][5].display = false // this.commonKeyBoard[0][6].display = false // this.commonKeyBoard[0][7].display = false // this.commonKeyBoard[0][8].display = false // this.commonKeyBoard[0][9].display = false // // this.commonKeyBoard[4][0].display = false // this.commonKeyBoard[4][1].display = false // this.commonKeyBoard[4][2].display = false // } else if (input && input.length === 2) { // this.commonKeyBoard[0][0].display = false // this.commonKeyBoard[0][1].display = false // this.commonKeyBoard[0][2].display = false // this.commonKeyBoard[0][3].display = false // this.commonKeyBoard[0][4].display = false // this.commonKeyBoard[0][5].display = false // this.commonKeyBoard[0][6].display = false // this.commonKeyBoard[0][7].display = false // this.commonKeyBoard[0][8].display = false // this.commonKeyBoard[0][9].display = false // // this.commonKeyBoard[1][0].display = false // this.commonKeyBoard[1][1].display = false // this.commonKeyBoard[1][2].display = true // this.commonKeyBoard[1][3].display = false // this.commonKeyBoard[1][4].display = false // this.commonKeyBoard[1][5].display = false // this.commonKeyBoard[1][6].display = false // this.commonKeyBoard[1][7].display = false // this.commonKeyBoard[1][8].display = false // this.commonKeyBoard[1][9].display = false // // this.commonKeyBoard[2][0].display = true // this.commonKeyBoard[2][1].display = false // this.commonKeyBoard[2][2].display = true // this.commonKeyBoard[2][3].display = false // this.commonKeyBoard[2][4].display = false // this.commonKeyBoard[2][5].display = false // this.commonKeyBoard[2][6].display = false // this.commonKeyBoard[2][7].display = false // this.commonKeyBoard[2][8].display = false // // this.commonKeyBoard[3][0].display = true // this.commonKeyBoard[3][1].display = false // this.commonKeyBoard[3][2].display = true // this.commonKeyBoard[3][3].display = false // this.commonKeyBoard[3][4].display = true // this.commonKeyBoard[3][5].display = false // this.commonKeyBoard[3][6].display = false // // this.commonKeyBoard[4][0].display = false // this.commonKeyBoard[4][1].display = false // this.commonKeyBoard[4][2].display = false // } else { // this.commonKeyBoard[0][0].display = true // this.commonKeyBoard[0][1].display = true // this.commonKeyBoard[0][2].display = true // this.commonKeyBoard[0][3].display = true // this.commonKeyBoard[0][4].display = true // this.commonKeyBoard[0][5].display = true // this.commonKeyBoard[0][6].display = true // this.commonKeyBoard[0][7].display = true // this.commonKeyBoard[0][8].display = true // this.commonKeyBoard[0][9].display = true // // this.commonKeyBoard[1][0].display = true // this.commonKeyBoard[1][1].display = true // this.commonKeyBoard[1][2].display = true // this.commonKeyBoard[1][3].display = true // this.commonKeyBoard[1][4].display = true // this.commonKeyBoard[1][5].display = true // this.commonKeyBoard[1][6].display = true // this.commonKeyBoard[1][7].display = true // this.commonKeyBoard[1][8].display = true // this.commonKeyBoard[1][9].display = true // // this.commonKeyBoard[2][0].display = true // this.commonKeyBoard[2][1].display = true // this.commonKeyBoard[2][2].display = true // this.commonKeyBoard[2][3].display = true // this.commonKeyBoard[2][4].display = true // this.commonKeyBoard[2][5].display = true // this.commonKeyBoard[2][6].display = true // this.commonKeyBoard[2][7].display = true // this.commonKeyBoard[2][8].display = true // // this.commonKeyBoard[3][0].display = true // this.commonKeyBoard[3][1].display = true // this.commonKeyBoard[3][2].display = true // this.commonKeyBoard[3][3].display = true // this.commonKeyBoard[3][4].display = true // this.commonKeyBoard[3][5].display = true // this.commonKeyBoard[3][6].display = true // // this.commonKeyBoard[4][0].display = true // this.commonKeyBoard[4][1].display = true // this.commonKeyBoard[4][2].display = true // } } //改变输入框选中的值 handelInputTxt(length: number, _val: string) { for (let i = 0; i < this.carNumberMaxLength; i++) { this.showMouse[i] = false } this.showMouse[length] = true } //自定义键盘样式 @Builder CustomKeyboardBuilder() { Column() { if (this.isFirstInput) { this.buildProvinceKeyboard(this.provincesKeyBoard[0]) this.buildProvinceKeyboard(this.provincesKeyBoard[1]) this.buildProvinceKeyboard(this.provincesKeyBoard[2]) this.buildProvinceKeyboard(this.provincesKeyBoard[3]) } else { this.buildCommonKeyboard(this.commonKeyBoard[0]) this.buildCommonKeyboard(this.commonKeyBoard[1]) this.buildCommonKeyboard(this.commonKeyBoard[2]) this.buildCommonKeyboard(this.commonKeyBoard[3]) this.buildCommonKeyboard(this.commonKeyBoard[4]) } }.backgroundColor(0xf0f0f0).padding({ bottom: px2vp(this.bottomRectHeight) }) } @Builder buildCommonKeyboard(keyboard: CommonKeyItem[]) { Grid() { ForEach(keyboard, (item: CommonKeyItem) => { GridItem() { if (item.key === getStringFromResource($r("app.string.item_key_delete"))) { Text() { ImageSpan($r('app.media.custom_keyboard_delete')) .width('100px') .height('100px') .objectFit(ImageFit.Fill) .verticalAlign(ImageSpanAlignment.CENTER); } .fontSize(16) .textAlign(TextAlign.Center) .width(36) .height(40) .backgroundColor(Color.White) .borderRadius(4) .onClick(() => { this.carNumberText = this.carNumberText.slice(0, -1); }); } else { if (item.display) { Text(item.key) .width(25) .backgroundColor(Color.White) .fontSize(16) .textAlign(TextAlign.Center) .width(35) .height(40) .backgroundColor(Color.White) .borderRadius(4) .onClick(() => { if (this.carNumberText.length < this.carNumberMaxLength) { this.carNumberText += item.key; } }); } else { Text(item.key) .width(25) .backgroundColor(Color.White) .fontSize(16) .textAlign(TextAlign.Center) .width(35) .height(40) .backgroundColor(0xE0E0f0) .borderRadius(4) .onClick(() => { }); } } }; }); }.maxCount(keyboard.length).columnsGap(4).rowsGap(4).padding(3) } @Builder buildProvinceKeyboard(keyboard: string[]) { Grid() { ForEach(keyboard, (item: string) => { GridItem() { if (item == getStringFromResource($r("app.string.item_key_delete"))) { Text() { ImageSpan($r('app.media.custom_keyboard_delete')) .width('100px') .height('100px') .objectFit(ImageFit.Fill) .verticalAlign(ImageSpanAlignment.CENTER); } .fontSize(16) // .fontWeight(600) .textAlign(TextAlign.Center) .width(38) .height(40) .backgroundColor($r("app.color.white")) .borderRadius(4) .onClick(() => { this.carNumberText = this.carNumberText.slice(0, -1); }); } else { Text(item) .fontSize(16)// .fontWeight(600) .textAlign(TextAlign.Center) .width(38) .height(40) .backgroundColor($r("app.color.white")) .borderRadius(4) .onClick(() => { if (!item) { return } if (this.carNumberText.length < this.carNumberMaxLength) { this.carNumberText += item; } }); } }; }); } .maxCount(keyboard.length) .columnsGap(4) .rowsGap(4) .padding(3) } @Builder carNumberComponentBuilder() { Column() { this.buildCarNumberInput() } } //车牌号码构造器 @Builder buildCarNumberInput() { Flex({ direction: FlexDirection.Row, alignItems: ItemAlign.Center, justifyContent: FlexAlign.SpaceBetween }) { Column() { Row() { Text(this.carNumberText[0]) .fontSize(16) .textAlign(TextAlign.Center) .width(this.inputBoxSize) .height(this.inputBoxSize) .margin({ left: 1, right: 1 }) .border(this.showMouse[this.carNumberIndex[0]] ? this.btnCancelBorderActive : this.btnCancelBorder) .borderRadius(5) Text(this.carNumberText[1]) .fontSize(16) .textAlign(TextAlign.Center) .width(this.inputBoxSize) .height(this.inputBoxSize) .margin({ left: 1, right: 1 }) .border(this.showMouse[this.carNumberIndex[1]] ? this.btnCancelBorderActive : this.btnCancelBorder) .borderRadius(5) Text(this.carNumberText[2]) .fontSize(16) .textAlign(TextAlign.Center) .width(this.inputBoxSize) .height(this.inputBoxSize) .margin({ left: 1, right: 1 }) .border(this.showMouse[this.carNumberIndex[2]] ? this.btnCancelBorderActive : this.btnCancelBorder) .borderRadius(5) Text(this.carNumberText[3]) .fontSize(16) .textAlign(TextAlign.Center) .width(this.inputBoxSize) .height(this.inputBoxSize) .margin({ left: 1, right: 1 }) .border(this.showMouse[this.carNumberIndex[3]] ? this.btnCancelBorderActive : this.btnCancelBorder) .borderRadius(5) Text(this.carNumberText[4]) .fontSize(16) .textAlign(TextAlign.Center) .width(this.inputBoxSize) .height(this.inputBoxSize) .margin({ left: 1, right: 1 }) .border(this.showMouse[this.carNumberIndex[4]] ? this.btnCancelBorderActive : this.btnCancelBorder) .borderRadius(5) Text(this.carNumberText[5]) .fontSize(16) .textAlign(TextAlign.Center) .width(this.inputBoxSize) .height(this.inputBoxSize) .margin({ left: 1, right: 1 }) .border(this.showMouse[this.carNumberIndex[5]] ? this.btnCancelBorderActive : this.btnCancelBorder) .borderRadius(5) Text(this.carNumberText[6]) .fontSize(16) .textAlign(TextAlign.Center) .width(this.inputBoxSize) .height(this.inputBoxSize) .margin({ left: 1, right: 1 }) .border(this.showMouse[this.carNumberIndex[6]] ? this.btnCancelBorderActive : this.btnCancelBorder) .borderRadius(5) Text(this.carNumberText[7]) .fontSize(16) .textAlign(TextAlign.Center) .width(this.inputBoxSize) .height(this.inputBoxSize) .margin({ left: 1, right: 1 }) .border(this.showMouse[this.carNumberIndex[7]] ? this.btnCancelBorderActive : this.btnCancelBorder) .borderRadius(5) } .onClick(() => { focusControl.requestFocus('LicensePlateInput') }).width('100%').justifyContent(FlexAlign.SpaceBetween) TextInput() .width('100%') .height(250) .opacity(0) .id('LicensePlateInput') .enableKeyboardOnFocus(true) .customKeyboard(this.CustomKeyboardBuilder()) }.width('100%') } .height(32) .id("customInput") .defaultFocus(false) } } export interface commonBorder { width?: Length | EdgeWidths, color?: ResourceColor | EdgeColors, radius?: Length | BorderRadiuses, style?: BorderStyle | EdgeStyles } class CommonKeyItem { key: string; display: boolean; constructor(key: string, display: boolean) { this.key = key; this.display = display } }
-
Harmony OS Next实现长按复制内容 爱车记App有个查询附近充电站的功能,为了方便使用在其他导航使用(我们默认使用的是华为的花瓣地图,因为花瓣地图POI查询不支持电价,比较不方便),我们支持在充电站列表界面长按复制充电站名称,所以我们介绍一下,在Harmony OS Next中实现长按复制文本的功能。{mtitle title="封装公共复制方法"/}为了方便不同地方使用,我们增加一个复制的公共方法。/** * 复制 * @param text 复制的文本 */ export function copyText(text: string) { const pasteboardData = pasteboard.createData(pasteboard.MIMETYPE_TEXT_PLAIN, text); const systemPasteboard = pasteboard.getSystemPasteboard(); systemPasteboard.setData(pasteboardData); // 将数据放入剪切板 IBestToast.show({ message: getStringFromResource($r("app.string.copy_success")) }); }{mtitle title="实现长按复制"/}ListItem() { if (this.renderItem) { this.renderItem(nearbyChargeStation, index) } } .onClick(() => { this.naviChargeState(nearbyChargeStation) }) .swipeAction({ end: () => { this.swiperAction(nearbyChargeStation, index) } }) .borderRadius(8) .backgroundColor($r("app.color.white")) .gesture( LongPressGesture({ repeat: false, fingers: 1 }) .onAction((event: GestureEvent) => { if (event) { copyText(nearbyChargeStation.name) } }) .onActionEnd((event: GestureEvent) => { }) )我们重点关注.gesture( LongPressGesture({ repeat: false, fingers: 1 }) .onAction((event: GestureEvent) => { if (event) { copyText(nearbyChargeStation.name) } }) .onActionEnd((event: GestureEvent) => { }) )LongPressGesture代表长按手势:参数repeat代表是否重复触发,因为我们只是复制一次,因此设置false。fingers代表手指个数,取值范围是[1,10],我们这里只需要一个手指即可,因此设置1。onAction是触发事件,我们调用封装的公共copyText方法。onActionEnd是结束触发事件,如果有其他操作,比如清理资源啥的,可以在这个事件中处理。
-
typora 1.9.5破解教程 两年半之前,我们介绍过Typora 1.2.4破解版 。时过境迁,Typora现在也更新到1.9.5版本了。typora 1.9.5破解与1.2.4版本一样简单。壹、安装Typora直接从官网下载1.9.5版本即可。贰、替换winmm.dll下载下面的zip文件,解压之后得到winmm.dll {abtn icon="fa-download" color="#ff6800" href="https://oss.xiangcaowuyu.net/typecho/uploads/2025/01/4140134200.zip" radius="" content="winmm.zip"/} 将winmm.dll复制到Typora的安装目录即可。
-
Navicat 最新版(16、17)永久激活教程 {mtitle title="版本说明"/}本教程适用于Navicat最新的16、17版本,截止本文发文时,17最新版本为17.1.12本教程测试版本为Navicat Premium 17.1.12版本,其他版本未做测试,理论上是通用的本教程只适合Windows版本,Mac OS 及Linux版本不支持{mtitle title="本文使用的资源文件"/}Navicat安装包,可自行在官网下载对应版本。winmm.zip破解包,通过以下链接下载{abtn icon="fa-download" color="#ff6800" href="https://oss.xiangcaowuyu.net/typecho/uploads/2025/01/1120572478.zip" radius="" content="winmm.zip"/}{mtitle title="使用教程"/}壹、卸载旧版本的Navicat未安装过的用户可直接跳过该步骤,如果已安装旧版本的Navicat,记得先卸载干净,防止破解失效,卸载完成后将以下内容复制下来,新建一个的Navicat.bat脚本,然后双击执行。一闪而过表示正常,已成功删除Navicat的注册信息和相关的注册表数据。@echo off echo Delete HKEY_CURRENT_USER\Software\PremiumSoft\NavicatPremium\Registration[version and language] for /f %%i in ('"REG QUERY "HKEY_CURRENT_USER\Software\PremiumSoft\NavicatPremium" /s | findstr /L Registration"') do ( reg delete %%i /va /f ) echo. echo Delete Info folder under HKEY_CURRENT_USER\Software\Classes\CLSID for /f %%i in ('"REG QUERY "HKEY_CURRENT_USER\Software\Classes\CLSID" /s | findstr /E Info"') do ( reg delete %%i /va /f ) echo. echo Finish贰、安装Navicat安装过程不做过多赘述,正常安装即可。{message type="error" content="需要注意,安装完成之后,不要打开Navicat"/}叁、替换winmm.dll文件将资源文件中的winmm.zip解压后,会得到winmm.dll文件,将winmm.dll复制到Navicat的安装目录。操作完成后,打开Navicat,如果没有提示试用,则说明激活成功,可永久使用
-
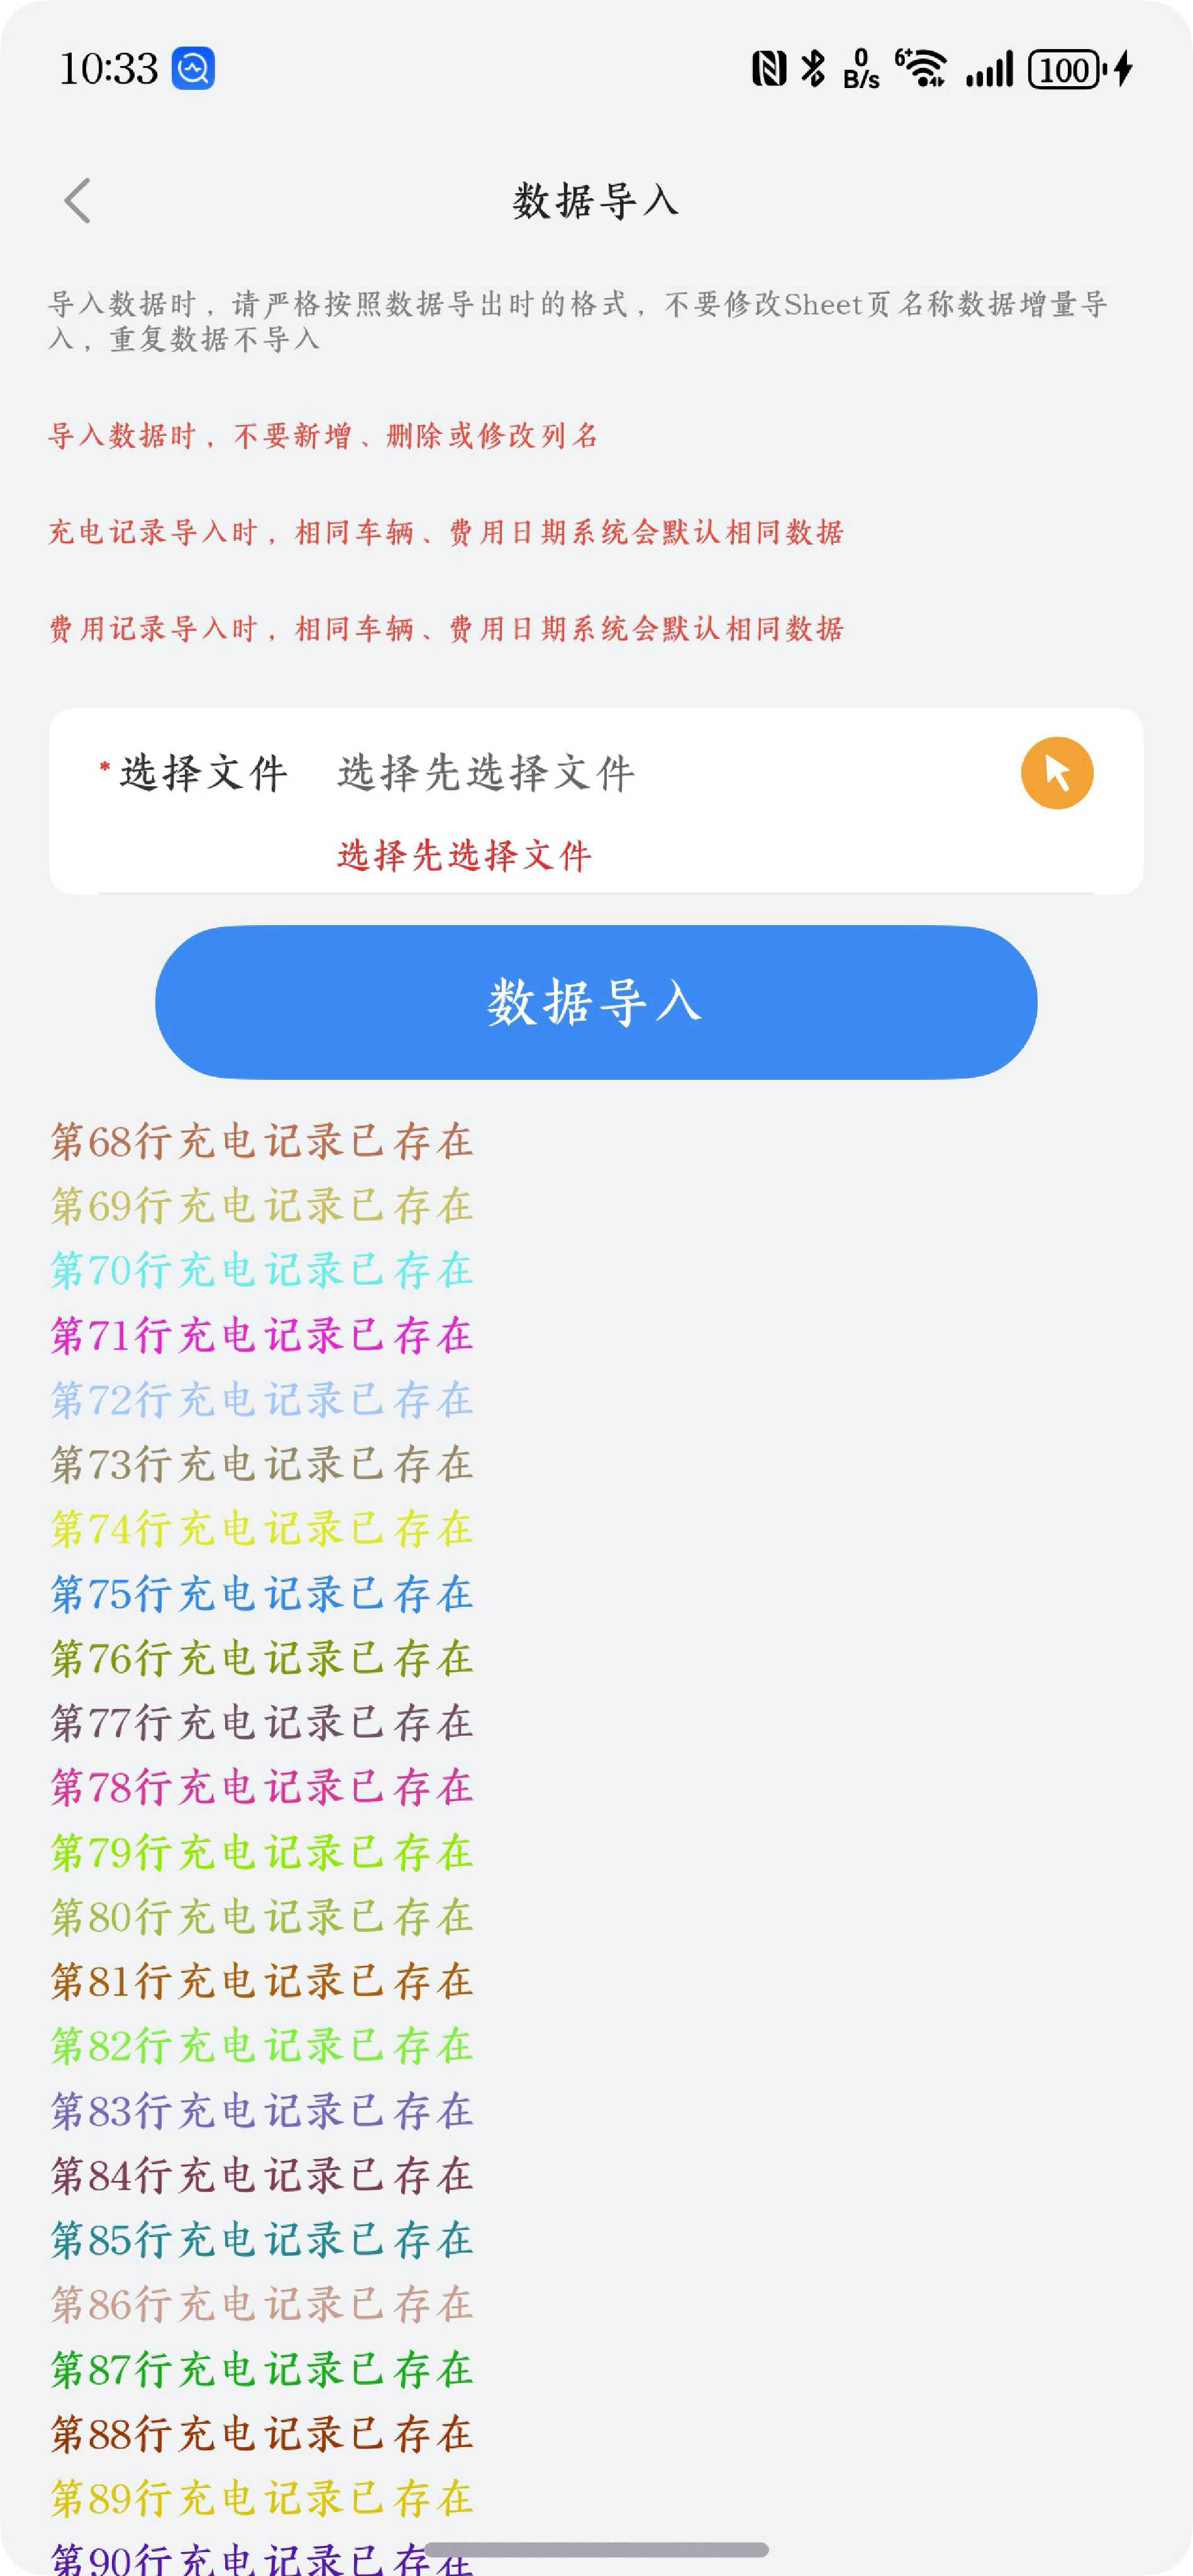
Harmony OS Next中List铺满剩余屏幕 在Harmony OS Next开发过程中,我们经常使用List组件进行数据展示。比如爱车记App中,有一个Excel导入功能,后台将错误信息按照数组形式返回,前端通过List组件展示错误信息。整体页面大概如下,这里主要面临两个问题页面是沉浸式布局List组件内容数量不固定如果List内容足够多时,我们将List组件滚动到最下面,会发现底部的内容被导航栏(非安全区域)遮挡了。相似下图展示的界面,实际List组件有101条,但是只展示出来了90条。为了解决这个问题,我们可以给List设置.layoutWeight(1)属性,这样List组件变能够铺满剩余屏幕。 List({ space: 5 }) { ForEach(this.errorList, (item: string) => { ListItem() { Text(item).fontSize(14).fontColor(getRandomColor(1)).width('100%') } }) } .padding({ left: 15, right: 15 }) .scrollBar(BarState.Off) .borderRadius(8).layoutWeight(1)
-
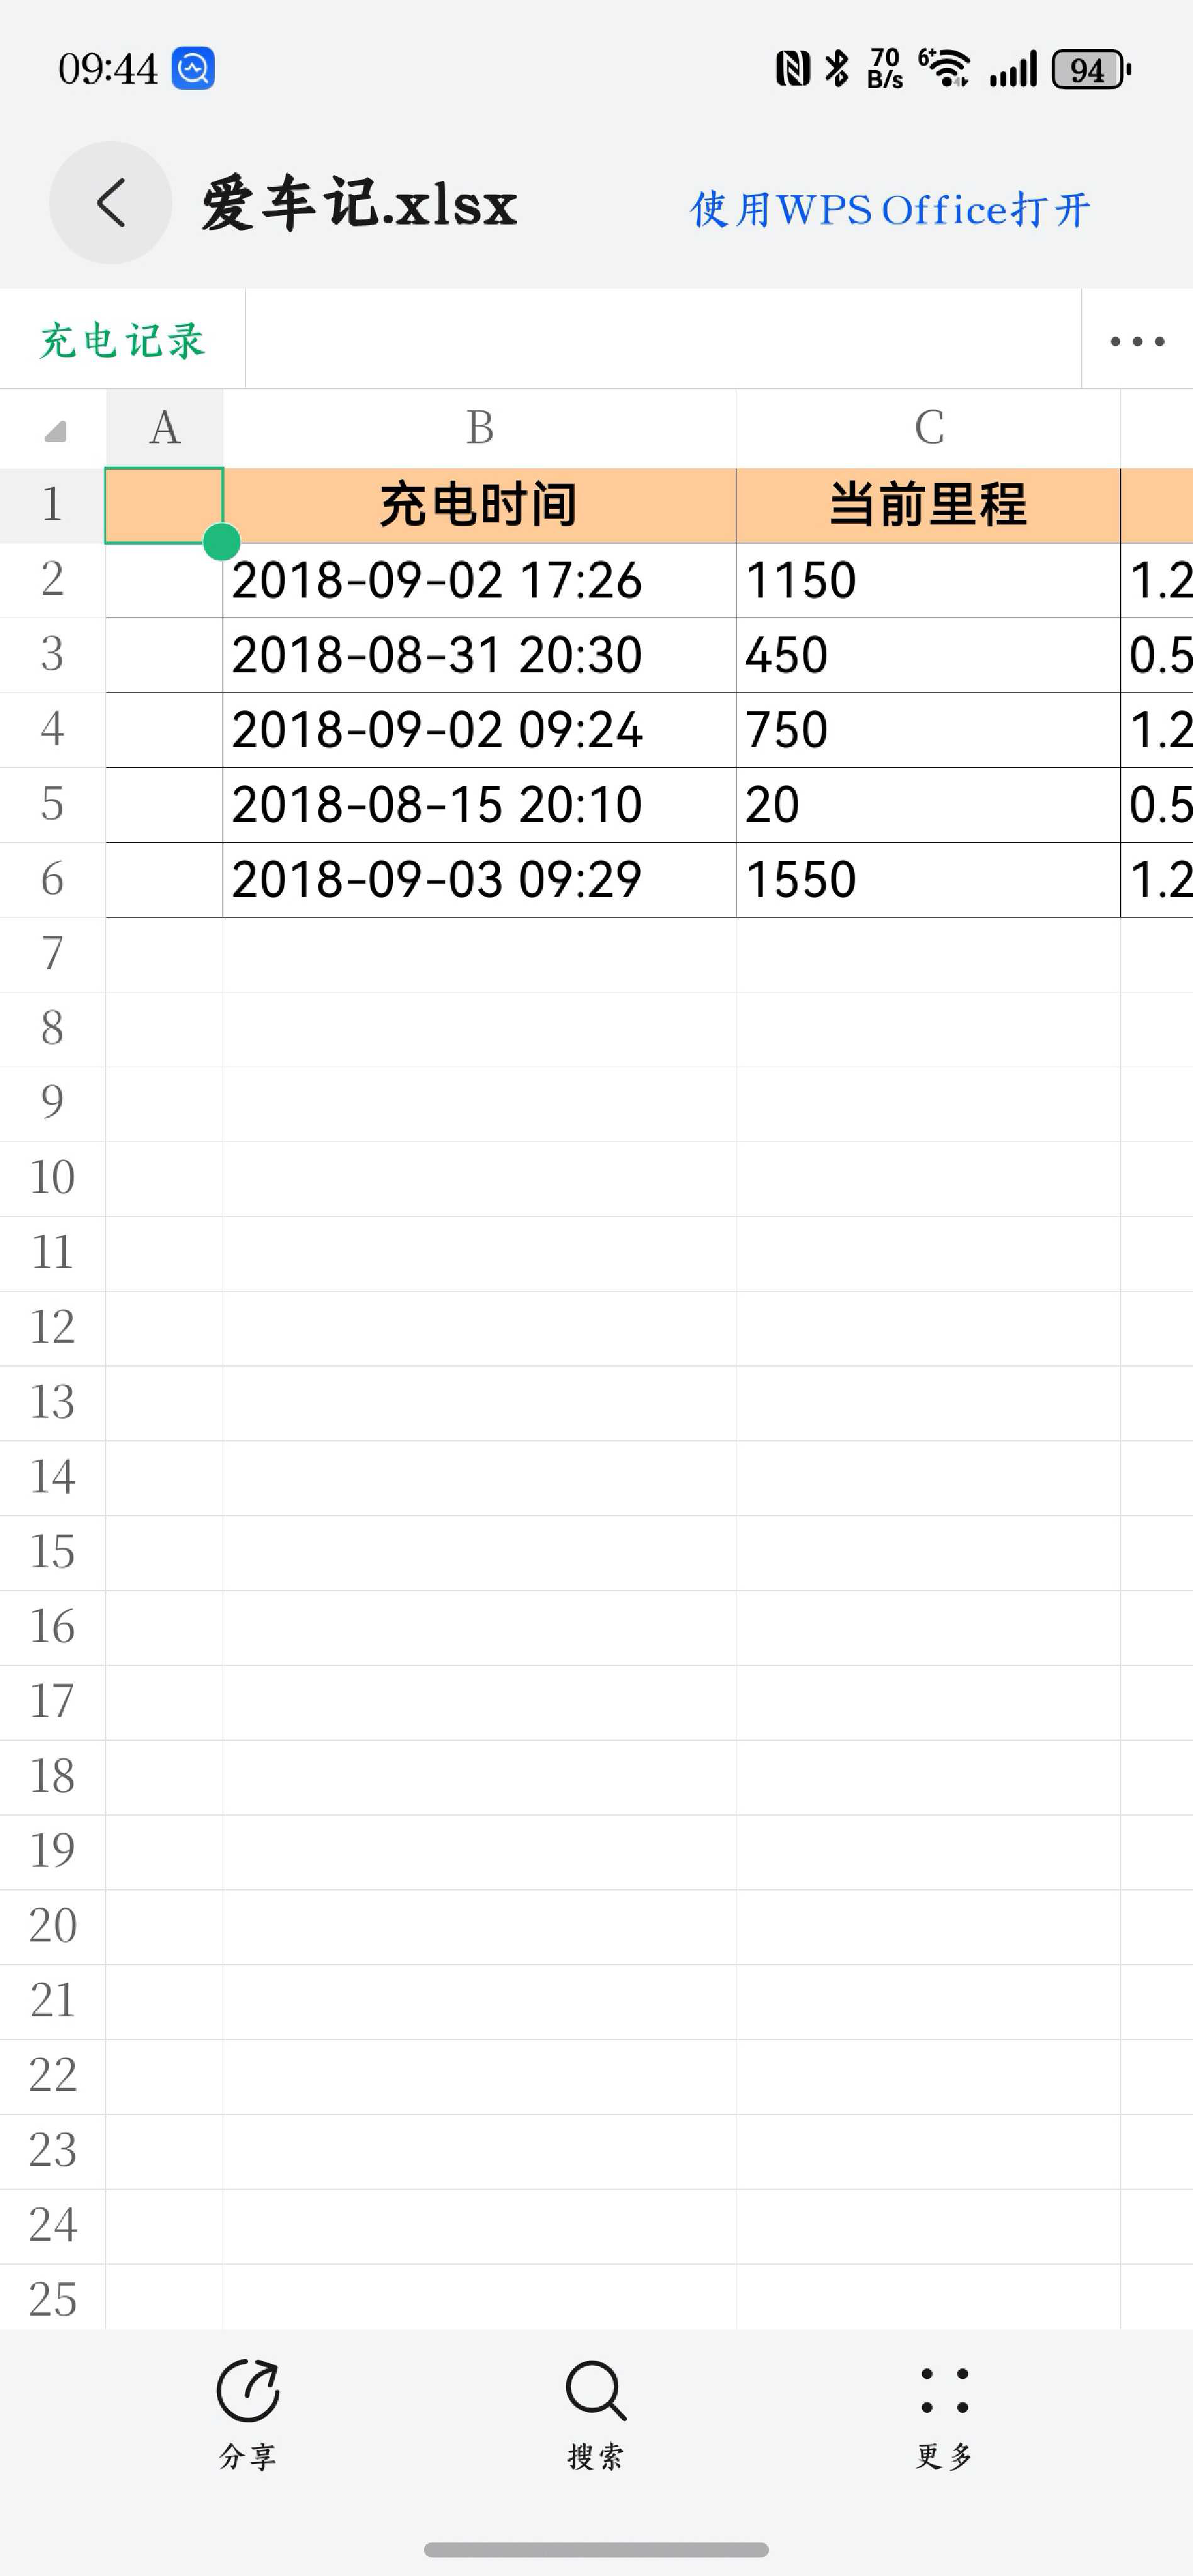
Harmony OS Next实现文件分享 在日常开发过程中,将数据导出到Excel是常见的一种需求。爱车记App有个数据导出功能,可以将用户的充电记录导出Excel,因为Harmony OS Next的沙盒机制,默认导出的文件只能保存到App自己的目录中,为了方便用户保存数据,我们可以通过文件分享功能,用户可以将文件保存到手机的任意位置。一、后端导出Excel文件后端代码我们不做过多介绍,就是使用EasyExcel导出Excel文件并下载。/** * 数据导出 * * @throws IOException IO异常 */ @GetMapping(value = "export", produces = MediaType.APPLICATION_OCTET_STREAM_VALUE) public void export() throws IOException { ServletRequestAttributes servletRequestAttributes = (ServletRequestAttributes) RequestContextHolder.getRequestAttributes(); HttpServletResponse response = null; HttpServletRequest request = null; if (servletRequestAttributes != null) { response = servletRequestAttributes.getResponse(); request = servletRequestAttributes.getRequest(); } if (response == null) { throw new CustomException("未获取到用户信息"); } response.setContentType("application/x-msdownload"); response.setCharacterEncoding("utf-8"); response.setHeader("Content-Disposition", "attachment;filename=" + URLEncoder.encode("充电记录.xlsx", "UTF-8")); response.setHeader("Access-Control-Allow-Origin", "*"); response.setHeader("Access-Control-Expose-Headers", "Content-Disposition"); // 创建excel对象 CarUser user = tokenUtil.getLoginUser(request); List<CarEnergyExportVO> carEnergyList4Export = carEnergyService.selectCarEnergyList4Export(user.getId()); //内容样式策略 WriteCellStyle contentWriteCellStyle = new WriteCellStyle(); //垂直居中,水平居中 contentWriteCellStyle.setVerticalAlignment(VerticalAlignment.CENTER); contentWriteCellStyle.setHorizontalAlignment(HorizontalAlignment.LEFT); contentWriteCellStyle.setBorderLeft(BorderStyle.THIN); contentWriteCellStyle.setBorderTop(BorderStyle.THIN); contentWriteCellStyle.setBorderRight(BorderStyle.THIN); contentWriteCellStyle.setBorderBottom(BorderStyle.THIN); //设置 自动换行 contentWriteCellStyle.setWrapped(true); // 字体策略 WriteFont contentWriteFont = new WriteFont(); // 字体大小 contentWriteFont.setFontHeightInPoints((short) 12); contentWriteFont.setFontName("仿宋"); contentWriteCellStyle.setWriteFont(contentWriteFont); //头策略使用默认 设置字体大小 WriteCellStyle headWriteCellStyle = new WriteCellStyle(); WriteFont headWriteFont = new WriteFont(); headWriteFont.setFontHeightInPoints((short) 12); headWriteFont.setFontName("仿宋"); headWriteCellStyle.setWriteFont(headWriteFont); headWriteCellStyle.setFillForegroundColor(IndexedColors.TAN.getIndex()); ExcelWriter excelWriter = EasyExcel.write(response.getOutputStream(), CarEnergyExportVO.class) .registerWriteHandler(new HorizontalCellStyleStrategy(headWriteCellStyle, contentWriteCellStyle)) .build(); //创建sheet WriteSheet writeSheet = EasyExcel.writerSheet("充电记录").head(CarEnergyExportVO.class).build(); //导出 excelWriter.write(carEnergyList4Export, writeSheet); excelWriter.finish(); }二、下载文件文件下载我们调用downloadFile(context: BaseContext, config: DownloadConfig)方法,context是上下文信息,DownloadConfig是参数信息,其中url是我们的后台地址,filePath是文件保存到本地的路径,header是传递到后端的头部信息,比如我这里的token是传递的认证信息。在下载文件的回调方法中,我们监听downloadTask事件,complete代表文件下载完成,文件下载文成后,调用分装的公共的文件分享方法shareFile对文件进行分享。 IBestToast.show({ icon: $r("app.media.mine_exporting_data"), message: getStringFromResource($r("app.string.exporting")) }) try { // 判断文件是否存在,存在就删除 let context = getContext(this) as common.UIAbilityContext; let filesDir = context.filesDir; let path = filesDir + '/爱车记.xlsx'; if (fs.accessSync(path)) { fs.unlinkSync(path); } request.downloadFile(context, { url: Constants.API + '/common/export', filePath: path, header: { "token": PreferencesUtil.readDataSync<string>("token") } }).then((downloadTask: request.DownloadTask) => { downloadTask.on('complete', () => { IBestToast.hide() shareFile(path) // let file = fs.openSync(filesDir + '/car_expense.xlsx', fs.OpenMode.READ_WRITE); // let arrayBuffer = new ArrayBuffer(1024); // let readLen = fs.readSync(file.fd, arrayBuffer); // let buf = buffer.from(arrayBuffer, 0, readLen); // console.info(`The content of file: ${buf.toString()}`); // fs.closeSync(file); }) }).catch((err: BusinessError) => { IBestToast.hide() console.error(`Invoke downloadTask failed, code is ${err.code}, message is ${err.message}`); }); } catch (error) { IBestToast.hide() let err: BusinessError = error as BusinessError; console.error(`Invoke downloadFile failed, code is ${err.code}, message is ${err.message}`); }三、文件分享方法文件分享时,我们传递文件的路径,这里有两个注意事项:action:这个地方我们需要使用ohos.want.action.viewData,如果调用ohos.want.action.sendData,会使用默认的程序打开,比如我这里是Excel文件,如果安装了WPS,会直接调用WPS打开type:这个是MIME Type,比如Excel 2007后续版本(xlsx后缀)默认为application/vnd.openxmlformats-officedocument.spreadsheetml.sheet/** * 分享文件 */ export async function shareFile(filePath: string) { let context = AppStorage.get('context') as common.UIAbilityContext; // 获取文件沙箱路径 // let filePath = this.context.filesDir + '/test.txt'; // 将沙箱路径转换为 URI let uri = fileUri.getUriFromPath(filePath); // 创建分享意图 let want: Want = { flags: wantConstant.Flags.FLAG_AUTH_WRITE_URI_PERMISSION | wantConstant.Flags.FLAG_AUTH_READ_URI_PERMISSION, action: 'ohos.want.action.viewData', uri: uri, type: 'application/vnd.openxmlformats-officedocument.spreadsheetml.sheet' }; // 启动分享 context.startAbility(want) .then(() => { console.log('Share file successfully'); }) .catch((err: BusinessError) => { console.error('Failed to share file:', err); }); }四、配置权限为了实现分享,我们需要在模块下的module.json5文件中配置相应的权限,在skills的uris添加如下内容{ "scheme": "file", "host": "*", "path": "/storage/*" }
-
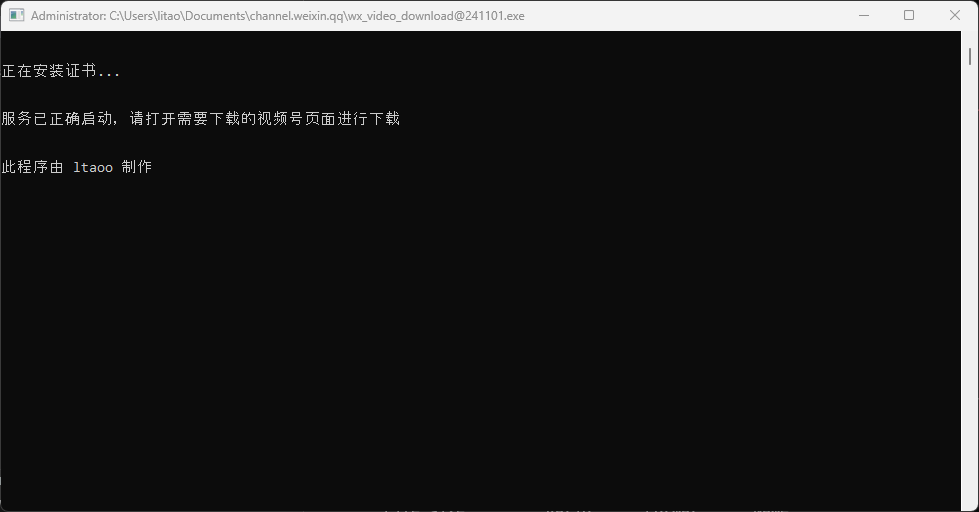
开源免费的微信视频号下载工具 主要功能一键下载:在视频号页面直接添加下载按钮,无需复制链接或者抓包多画质选择:支持下载不同清晰度的视频,包括原始视频质量图片下载:支持批量下载视频号中的图片内容,自动打包成压缩文件直播回放:支持下载视频号的直播回放内容跨平台支持:同时支持 Windows 和 macOS 系统 使用说明安装过程非常简单,只需要下载对应系统的可执行文件即可使用,不过 Windows 和 macOS 的安装步骤略有不同。Windows安装说明下载 Windows 版本的可执行文件,以管理员身份运行,首次打开会自动安装证书,然后启动服务。当终端提示「服务已正确启动」就说明可以使用了。Mac OS安装说明- 下载 macOS 版本的可执行文件(文件名类似 wx_video_download_drawin_xxx)- 打开终端,进入文件所在目录- 执行以下命令赋予文件执行权限:chmod +x ./wx_video_download_drawin_xxx- 使用管理员权限运行程序sudo ./wx_video_download_drawin_xxx- 请求安装证书权限,同意即可使用说明打开微信PC端,点击需要下载的视频,在视频下方的操作按钮一栏,会多出一个下载按钮,如下所示- 如果没有,可以看看「更多」这里是否有「下载视频」按钮。- 等待视频开始播放,然后暂停视频,点击下载按扭即可下载视频。下载成功后,会在上方显示已下载的文件,下载文件名最后面会标志该视频质量。项目地址{anote icon="fa-download" href="https://github.com/ltaoo/wx_channels_download?tab=readme-ov-file" type="secondary" content="https://github.com/ltaoo/wx_channels_download?tab=readme-ov-file"/}
-
Harmony OS Next封装公共资源访问方法 在Harmony OS Next开发时,对于静态字符串常量,我们都是定义在resources文件夹下的string.json文件中,在日常访问时,通过$r进行访问,如下Text($r("app.string.agree")).fontSize(14)这种方式访问资源文件,只适用于有前端上下文的地方,比如我们前端页面或公共的组件中,如果我们在封装的公共方法中或者其他定义API的界面,这种方式是获取不到值的。为了在所有地方都能获取到资源文件的值,我们可以借助应用上下文获取ResourceManager后,调用不同资源管理接口访问不同资源,比如还是上面的资源文件,我们可以通过getContext().resourceManager.getStringSync($r("app.string.agree"))当然,上面这段代码里面还是有应用的上下文信息getContext(),这个上下文不是一直都能取到的,为了便捷获取资源文件,我们可以将上下文信息存储到AppStorage中,这样通过定义一个公共方法,从AppStorage中获取到应用上下文信息即可。一、存储上下文信息在应用启动的时候,我们EntryAbility.ets文件中的onWindowStageCreate方法中,将应用上下文信息存储到AppStorage中。AppStorage.setOrCreate('context', this.context);二、定义获取资源文件的公共方法/** * 获取string中的值 * @param source 资源文件 * @returns 值 */ export function getStringFromResource(source: Resource) { let context = AppStorage.get('context') as common.UIAbilityContext let value = context.resourceManager.getStringSync(source.id) return value }三、使用这样,我们在应用程序的任意位置就能访问资源文件了。getStringFromResource($r("app.string.notify"))
-
Harmony OS Next实现调用系统邮件App发送邮件功能 爱车记App有一个【问题反馈】功能,用户点击此功能后,会自动打开Harmony OS Next自带的邮件功能,并且在收件人里面填充我们的邮箱,邮件内容默认填充请在此处详细描述您遇到的问题,在Harmony OS Next中,我们可以通过want方式打开邮件App并传递对应参数。 /** * 问题反馈 */ feedback() { let ctx = getContext(this) as common.UIAbilityContext; let mailUri: string = 'mailto:收件人?subject=邮件主题&body=邮件内容' let want: Want = { bundleName: 'com.huawei.hmos.email', abilityName: 'EntryAbility', moduleName: 'entry', uri: mailUri, action: 'ohos.want.action.viewData', }; try { ctx.startAbility(want) .then(() => { console.info('startAbility success'); }) .catch((err: BusinessError) => { console.info('startAbility error.', err.message); }) } catch (e) { console.info('error:', e); } }
-
Mac卸载微信输入法 之前体验了一段时间的微信输入法,各方面使用起来,也没感觉到比系统自带的输入法强在哪,当然只带了一个跨设备复制粘贴功能,但是我基本上也没有这块的需求。微信输入法的口号是:简洁、好用、打字快。但是说实在的,简洁这个确实挺简洁的,但是好用、打字快这两点,确实没体会到,好用这个见仁见智,但是打字快确实没感受到,跟搜狗、百度这些老牌输入法相比,差距还是比较大的。输入法的联想等等体验并不是很好。所以,最近打算卸载掉微信输入法,但是在Mac上卸载微信输入法,却并不像微信输入法描述的一样简洁,使用过搜狗输入法的应该知道,搜狗输入法卸载时,只需要下载搜狗输入法的安装包,它会提供一个卸载的选项,但是微信输入法,你可以尝试一下,它并没有提供卸载功能,如果想卸载微信输入法,会比较麻烦。壹、移除输入法打开输入法管理,找到微信输入法,点击左下角的-,删除掉微信输入法。贰、停用微信输入法的进程在【活动台】,找到【活动监视器】,找到【微信输入法】进程,点击上方的X,结束到微信输入法的进程。叁、删除微信输入法文件点击【访达】,在工具栏依次点击【前往】➡️【前往文件夹】,也可以输入快捷键command+shiff+G,输入/Library/Input Methods在打开的文件夹中能看到wetype.app,右键点击,然后点击【移到废纸篓】,在清空回收站就行了。肆、重新添加输入法重新启动Mac,然后重新添加输入法即可。